Dogs are very much a part of the family pack, and they love to be involved in everything you do – but they can easily take over the house with all their gear. Create some order by keeping all your pooch’s essentials in one place and DIY a stylish dog kennel for your furry bestie to hang out in, with a place to stash their snacks and gear for grooming and walkies. Your pup will know it has the best room in the house and your home stays clutter-free!
10 steps to building an indoor dog house
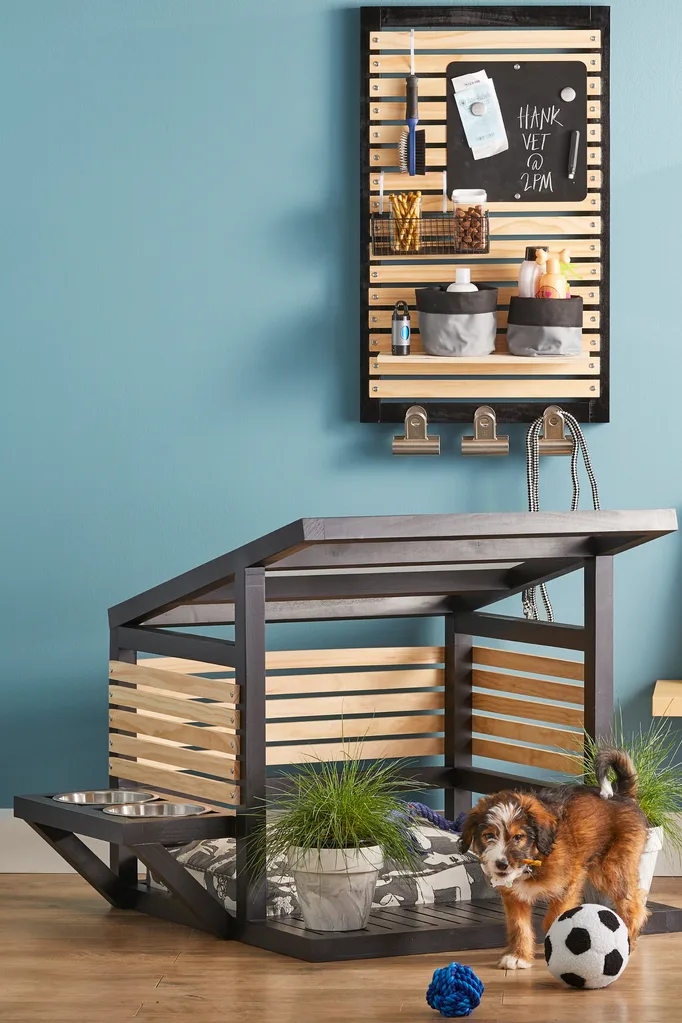
This doggy den has off-the-shelf timber, a basic toolkit, water, food bowls, shelves and a chalkboard.
Materials
- 42 x 42mm 2.4m dressed pine (9)
- 30 x 12mm 2.4m dressed pine (5)
- 60mm screws
- 900 x 600x 3mm PVC sheet
- black stain and varnish
- 20cm lipped stainless steel dog bowl (2)
- Tape measure
- combination square
- pencil
- mitre saw
- 80-grit sandpaper
- PVA glue
- drill
- 8g countersink tool
- 7mm spacers
- construction adhesive
Safety notes
When operating power tools, wear safety glasses, a mask, and earmuffs, and tie your hair back. When appropriate, wear gloves and protective clothing.
Step 1
Measure, mark and cut all components using a tape measure, combination square, pencil and mitre saw. Sand sawn edges with sandpaper. Paint all timber with black stain and varnish.
Step 2
To make the roof, assemble a ladder frame with two Long strips and four Short strips. Apply PVA glue to the ends of the Short strips and attach to the Long strips in a butt joint. To secure, use an 8g countersink tool to predrill through a Long strip and into a Short strip, insert screw and tighten. Set aside roof.
Step 3
To make the base, assemble a rectangle with two Long strips and two Short strips. Apply glue to the ends of the Short strips and attach to Long strips in a butt joint. To secure, predrill through the Long strip and into the short strip, insert and tighten screws.
Step 4
To create a porch, lay a Short strip within the rectangle, 235mm from one end. Predrill through Long strip and into Short strip, insert and tighten screws. Place Porch strips between Short strips, with 7mm spacers placed in between them. Apply PVA to both ends and attach to Short strips, predrill and secure with screws.
Step 5
To assemble the sides, apply PVA glue to square ends of Long posts and Short posts. Attach to Long strips of the base as shown in the assembly diagram. Check level. Predrill through underside of Long strip and into all posts. Insert and tighten screws. Apply PVA glue to ends of 2 Side slats, then attach between Long and Short posts (both sides), 185mm from base. Repeat, attaching Side strips 540mm from base.
Step 6
To complete the main frame, apply PVA glue to angled tops of all Short and Long posts, attach the roof with its back flush to the back edges of the Short posts. Predrill through the roof Long strips and into the Short/Long posts. Insert and tighten screws.
Step 7
To assemble a shelf for bowls, apply PVA to one end of all Dish short strips and attach in a butt joint to both ends of the Dish long strip and along the middle. Predrill through Long strip and into the Dish short strips, insert and tighten screws.
Step 8
To attach the shelf to the main frame, apply PVA glue to ends of on both ends short strips and attach to the lowest Side strip. Predrill through the Short strip and into the Dish short strip, insert and tighten screws. Apply PVA glue to both mitred ends of both Dish brackets, attach to connect underside of shelf to the base.
Step 9
For Side and Back slats, predrill a central pilot hole 10mm from both ends of all slats. With a level, combination square and 25mm spacers, attach 5 Side slats to both sides of frame, 30mm from Side strips. Repeat to attach 5 Back slats to back of frame.
Step 10
To finish, attach the PVC sheet to the middle of the Dog house roof slats with construction adhesive.
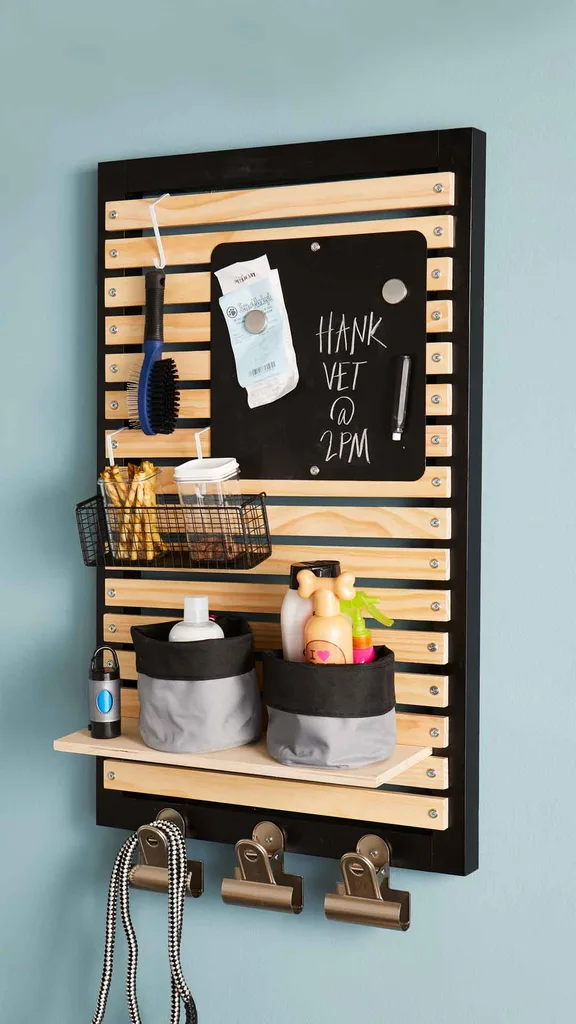
How to make a puppy memo board
Organise your doggo’s gear with a cute memo board.
Step 1
Create a rectangular frame with 42mm square profile timber. Use two long 900mm strips and two short 450mm strips. Paint all strips with black stain and allow to dry. Glue the ends of the short strips and attach between the long strips.
Step 2
Predrill and secure with 60mm screws. Using 30 x 12mm dressed pine, cut 16 slats to 500mm. Sand edges and attach to the rectangular frame, with 12mm spacers in between, and secure with 25mm screws.
Step 3
Use S hooks to hang items from board. Attach large bulldog clips to keep leashes and appointment reminders within easy access.
Step 4
For extra storage, create a removable slot-in shelf. With a small piece of 12mm plywood, measure and cut a 400 x 125mm rectangle. Sand edges, then push shelf between slats.
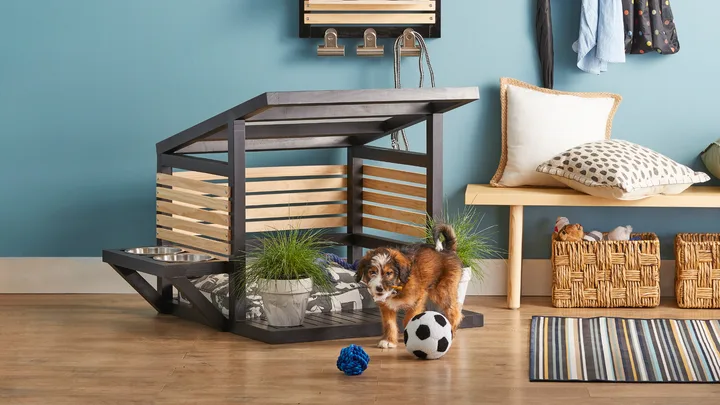 (Photographer: Carson Downing)
